There are few different ways that the "missing or corrupt hal.dll" error may present itself, with the first listing being the most common:
"Windows could not start because the following file is missing or corrupt:
Please re-install a copy of the above file."
"Winnt_root>\System32\Hal.dll missing or corrupt:
Please re-install a copy of the above file."
"Cannot find \Windows\System32\hal.dll"
"Cannot find hal.dll"
The "missing or corrupt hal.dll" error displays shortly after the computer is first started. Windows XP has not yet fully loaded when this error message appears.
Cause:
Causes of the "missing or corrupt hal.dll" error include, naturally, a damaged hal.dll file or a hal.dll file that has been deleted or moved from its intended location. Additional causes may include a damaged or missing boot.ini file or possibly a physically damaged hard drive.
Solutions:
1. Boot from your CD Windows XP
2. Select "r" at the first screen to start repair
3. Type number 1 (C:\Windows) and press enter
4. If you are asked password administrator, fill in or if you don’t have, just press enter
5. Type bootcfg /list to show current entries in file BOOT.INI
6. Type bootcfg /rebuild to repair the error
7. Remove CD and type "EXIT" then press ENTER (to reboot your computer)
Read More...
Monday, May 19, 2008
Missing Or Corrupt Hal.dll
C:\windows\system32\config\system missing or corrupt
If you turn on your computer and find an error message that says:
Windows could not start because the following file is missing or corrupt
C:\windows\system32\config\system
Or C:\windows\system32\config\software
You can attempt to repair this file by doing this step :
1. Boot from your CD Windows XP
2. Select "r" at the first screen to start repair
3. Type number 1 (C:\Windows) and press enter
4. If you are asked password administrator, fill in or if you don’t have, just press enter
5. Type cd\windows\system32\config
6. Depend on corrupt\missing section :
- if system, type: ren system system.bad
- if software, type: ren software software.bad
7. Then depend on corrupt\missing section :
- if system, type: copy \windows\repair\system
- if software, type: copy \windows\repair\software
8. Remove CD and type "EXIT" then press ENTER (to reboot your computer).
Read More...
Sunday, May 18, 2008
Missing or corrupt ntoskrnl.exe file
If the ntoskrnl.exe file is corrupt or missing this can also generate the error. To restore this file follow the below steps.
1. Insert the Microsoft Windows XP CD. Note: If you have a recovery CD or a restore CD and not a Microsoft Windows XP CD it is likely the below steps will not resolve your issue.
2. Reboot the computer, as the computer is starting you should see a message to press any key to boot from the CD. When you see this message press any key.
3. In the Microsoft Windows XP setup menu press the R key to enter the recovery console.
4. Select the operating system you wish to fix, and then enter the administrator password.
5. Type expand d:\i386\ntoskrnl.ex_ c:\windows\system32
6. You will then be prompted if you wish to overwrite the file type Y and press enter to overwrite the file.
7. Type exit to reboot the computer.
Read More...
Warning Message “Windows Virtual Memory is Low”
Here is what happening when you have a warning sign showing " Windows Virtual Memory is Low ". Your computer uses physical memory, aka RAM, and virtual memory. Virtual memory is used to simulate more RAM when your computer is reaching its maximum CPU and RAM usage. It very similar to a bucket filling up with water. If your CPU needs water you can bring this resources to it. But your bucket size is limited. The more programs you use and disk space the more water is needed. But you can only deliver the set amount of water because your bucket size is limited. The bucket is your RAM. However, you can use a spare bucket to quickly to help meet the demand. The virtual memory is that spare bucket.
You can change your virtual memory by altering amount of free resources for your computer to use for it, in a sense making the spare bucket bigger. Virtual memory uses free space as a resource. So you can change the the amount free space reserved for the Virtual memory.
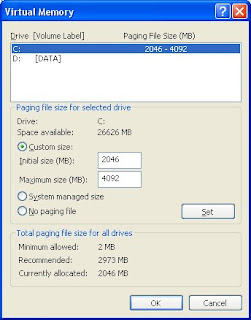
When you get to the Virtual Memory menu select the Custom Size check box. Then choose the initial size and the max size. Depending on how much free space you have you can choose what that amount of free space you want. If you are still confused the link below has a visual step by step instructions.
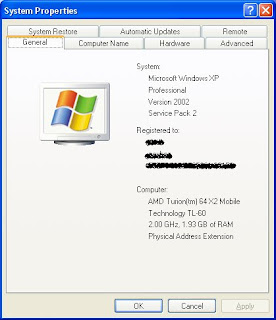
1.Click Start, and then click Control Panel.
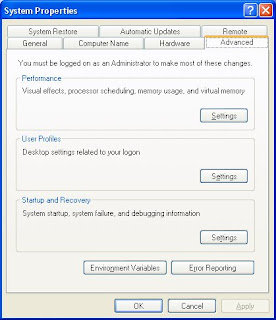
2.Click Performance and Maintenance, and then click System.

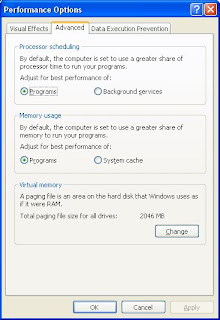
3.On the Advanced tab, under Performance, click Settings.


4.Under Virtual memory, click Change.

5.Under Drive [Volume Label], click the drive that contains the paging file that you want to change. In most computers its C:
6.Under Paging file size for selected drive, click to Custom size check box. You can enter the amount of memory you would like to reserve for Virtual memory by entering the initial and maximum size.
7.Click Set
Hot tip: Keep the initial and maximum size the same to cut down on your CPU access. This will stop your CPU from constantly change your Virtual memory paging size. Also set the size 1.5 times higher than your physical memory.
Friday, May 9, 2008
Printer Problems
If you have problem with your printer, there are some action that you have to do:
• Check the cables first. Unplug and replug the printer into the computer. Be sure the power cable is plugged in and the outlet works.
• Check to make sure the correct printer is selected in the Print Dialog box. If you are on a network, you could be sending the output to a printer in someone else's room.
• Can you print from a different application? Does it only occur with a certain application or is it not working with anything?
• Can you print a test page directly from the printer with it unconnected to the computer? Each manufacturer has their own special series of buttons to hold down for this self-test. Most of the time it will be in the user's manual.
Reinstall the software. Delete the old drivers first. Did that fix the problem?
Printer machine won’t turn on.
• Check to see if the power is on.
• Check to see if the printer cable plugged into the back of the printer and the wall.
Error lights are flashing.
Check the error display on the fax for jams, paper, toner, etc.
Can connect to the network.
Open the Network Neighborhood icon on your desktop. You should see a long list of servers. If not, reboot.
My printers are gone.
Open your Start Menu; go up to settings, then over to printers. You should see a list of your printers that you use there. If not, reboot.
My printer is set to work offline.
Open your Start Menu; go up to settings, then over to printers. Click once on your printer, select "File" in the top left corner and verify that "work offline" does NOT have a check mark next to it.
The printer is paused.
Open your Start Menu; go up to settings, then over to printers. Double click on your printer, select "File" in the top left corner and verify that "pause printing" does NOT have a check mark next to it.
Printer Does Not Respond.
First, make sure that the printer is online and has paper in the tray. Check to see if the printer will work with another program. If so, Clear the unit's memory by turning it off, waiting a few seconds, and turning it back on. (Check the printer cable to make sure it is firmly connected to the printer and the computer. Reinstall the printer, select Start-> Settings-> Printers to open the Printers folder. Right click the icon for the printer and select Delete. Then reinstall it by clicking the Add Printer icon.
Source
Read More...
Networking's Problem
If your computer doesn’t connect to the Internet, there are some action that you have to do:
• First check to see if the cable connecting the network card into the network drop is connected to the drop and to the computer.
• Check the back of the computer to see if the network card light is on.
• Check to see if the site you are trying to pull up is at fault by typing in a common URL to see if it will make it out to that site.
• Check to see if anyone else's machine is having problems. If everyone is, then it could be the network is having difficulties.
• If the Internet connection is off on a particular hallway only, a hub connection could be down or bad.
• If there is only one machine having problems and the light on the network card is not on, try plugging another machine that works into that drop. It could be that particular drop is bad, or plug the machine that doesn't seem to work into a different drop to see if it would work there.
• Record all the data and call the Help Desk.
• Only send a call in one way either by email, in person or by Phone. Sending it in more then one way can cause multiple trouble tickets and will slow down the time it takes to get the machine repaired.
Source
Read More...
Monitor’s Problem
If you have a new monitor, maybe your monitor isn’t configured correctly and maybe you are confused with that.
Here are some basic trouble shooting tips for new monitor:
1.The picture does not appear
- Check to make sure the signal cable is firmly connected in the socket.
- Check to see if the computer system's power is ON.
- Check that the Brightness Control is at the appropriate position, not at the minimum.
- Check to make sure the signal cable is firmly connected in the socket.
- Check that the output level matches the input level of your computer.
- Make sure the signal timing of the computer system is within the specification of the monitor.
- Adjust the H-Size, H-Phase or V-Size, V-Center controls.
- Check if the signal timing of the computer system is within the specification of the monitor.
- Check if the Brightness or contrast control is at the appropriate position, not at the maximum or minimum.
- Check if the specified voltage is applied
- Check if the signal timing of the computer system is within the specification of the monitor.
- Especially, check the horizontal frequency.
- Move all objects that emit a magnetic field, such as a motor or transformer, away from the monitor.
- Check if the specified voltage is applied.
- Check if the signal timing of the computer system is within the specification of the monitor.
NTLDR is Missing in Windows XP
There are few different ways that the "NTLDR is missing" error may present itself, with the first listing being the most common:
"NTLDR is missing
Press any key to restart"
"NTLDR is missing
Press Ctrl Alt Del to restart"
"Boot: Couldn't find NTLDR
Please insert another disk"
If you get the "NTLDR is Missing" error, follow these instructions:
1. Load Windows XP CD into CD drive.
Make sure BIOS is set to boot to CD drive.
Boot the computer from CD.
2. If a message appear “press any key to boot from CD…..” press any key in your keyboard.
3. At setup menu, press R to load Recovery Console
4. Type number 1 (C:\Windows) and press enter
5. If you are asked password administrator, fill in or if you don’t have, just press enter.
6. The following instructions assume CD-ROM is labeled as drive D and the hard drive partition the windows installation is on is labeled as drive C.
Type "COPY D:\i386\ntldr C:\" and press ENTER.
Type "COPY D:\i386\ntdetect.com C:\" and press ENTER.
7. Remove CD and type "EXIT" then press ENTER (to reboot your computer).
Read More...